How to build a pedalboard, part 6: Call your dad
Kategori: Guitar Effects, How To Build a Pedalboard
Ok, so your board design is perfect and you've got pedals, power supply and cables. Then all you need to do is build the pedalboard of your dreams. Which of course sounds much easier than it is, at least for some of us. I myself didn't really shine on the lessons in school where you were about to craft something. Fortunately, I knew someone who did - my dad, who nowadays works as a blacksmith. So I discussed my design with him and asked him to help me out turning it from paper to reality. Good for me, he did. Chances are that you also know someone who can help you out building your pedalboard and that you can return the favor in some other way. Or you can of course try on your own, but this isn't as easy as IKEA furniture (as if their stuff would be easy to piece together, I've used my fair share of foul language screwing together their shelves and chairs). But what I'd like to emphasize is that you make sure that your pedalboard is quality crafted and not carelessly put together in a quarter or two. Make sure that the job is done decently so that your great design also turns out great in reality. And if you encounter problems, think them through before you solve them. The best is if you can get feedback on your design before the building begins, because then you will realize if there's something mising or if your design is impossible to pull off. Don't rush, take your time and do a proper job. You will thank yourself, and the one who eventually assists you, later.
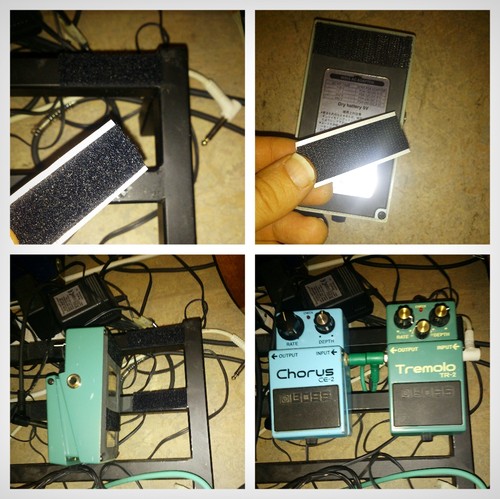
When the board is built there's only one thing left to do - hook up your pedals so they won't easily come off. When properly mounted you won't be afraid of pedals loosening from the board when it's transported from one place to another. What you is velcro tape. It's reliable, often pretty cheap and if you can't get hold of it in your local area it's easy to find on the Internet. The velcro tape is comprised of two parts: one that feels a bit fuzzy an one that's rougher on the surface. Fasten the fuzzy one on the pedalboard and the rough one under your pedal. Why, you might ask? Because most fabric made pedalboards has the fuzzy side on them, so if you want the oppurtunity to switch board to one of those it will be easy. Make sure to put the velcro tape exactly where you want it on the pedal, so it fits with your design. It's also beneficial if it doesn't get in the way of any screws that might be needed to open up the pedal if you want to change the battery. When this is done, fasten your pedals to the board, connect them to your power source and hook them together with cables. Connect your guitar and amp and enjoy the sound that comes out of your rig. And if it would be noise coming out, try to find what's wrong and try again. A good pedalboard is a way to get more artistic freedom byadding more colours to your palette of sounds that you need to paint your masterpiece.
My own pedalboard is made up of three different boards (yes, I own a lot of pedals) that goes into three different amps. This is of course a monster rig which I cannot bring to small club gigs. So when these events comes up I get the most essential pedals for a gig and fasten them on another, smaller board which I use exclusively for live situations. When I come home I move them back to my home rig, which I use for recording and writing. This works pretty well for me, hopefully you'll find a way that will work out good for you.